使用示例
- 使用扩展配置进行库初始化
- 向额外的API密钥发送统计数据
- 跟踪应用崩溃
- 手动监控应用崩溃
- 监控原生应用崩溃
- 使用库发送广告标识符
- 使用库发送设备位置
- 手动设置位置
- 发送自定义事件
- 发送自定义事件(包含嵌套参数)
- 从 WebView 的 JavaScript 代码发送事件
- 发送自定义错误消息
- 从缓冲区发送事件
- Sending ProfileId
- 发送个人资料属性
- 发送用户个人资料属性,使用第一方数据
- 发送电子商务事件
- 发送收入
- 发送广告收入
- 设置会话超时时长
- 设置应用版本
- 确定库的API级别(Android)
- 确定库的版本
- 跟踪安装来源
- 通过深链路跟踪应用打开
- 请求延迟深链
- 请求延迟深度链接参数
- 跟踪新用户
- 禁用和启用发送统计数据
- 获取 SDK ID AppMetrica
- 传送设备类型
使用扩展配置进行库初始化
扩展配置允许您启用/禁用日志记录、设置会话超时、传递跟踪预安装应用的参数等。
扩展配置设置在库初始化时立即生效。
要使用扩展的启动配置初始化库,请创建 AppMetricaConfig 类的实例,设置相应的参数,然后使用 AppMetrica.activate(Context context, AppMetricaConfig config) 方法激活库。
class YourApplication : Application() {
    override fun onCreate() {
        super.onCreate()
        // Creating an extended library configuration.
        val config = AppMetricaConfig.newConfigBuilder(API_KEY)
            // Setting up the configuration. For example, to enable logging.
            .withLogs()
            // ...
            .build()
        // Initializing the AppMetrica SDK.
        AppMetrica.activate(applicationContext, config)
        // Automatic tracking of user activity.
        AppMetrica.enableActivityAutoTracking(this)
    }
}
public class YourApplication extends Application {
    @Override
    public void onCreate() {
        super.onCreate();
        // Creating an extended library configuration.
        AppMetricaConfig config = AppMetricaConfig.newConfigBuilder(API_KEY)
                // Setting up the configuration. For example, to enable logging.
                .withLogs()
                // ...
                .build();
        // Initializing the AppMetrica SDK.
        AppMetrica.activate(getApplicationContext(), config);
        // Automatic tracking of user activity.
        AppMetrica.enableActivityAutoTracking(this);
    }
}
在应用程序运行时配置库,请使用AppMetrica类的方法。
向额外的API密钥发送统计数据
将数据发送到额外的 API 密钥可以让您为这些 API 密钥收集自己的统计数据。 你可以用这来控制其他用户对信息的访问权限。 例如,为了给分析师提供统计数据的访问权限,可以为额外的 API 密钥复制发送营销数据。 这样他们只会有访问所需信息的权限。
要将数据发送到额外的 API 密钥,必须使用报告器。 就像为主 API 密钥设置扩展启动配置一样,你可以为报告员设置扩展启动配置,发送事件、个人资料信息以及应用内购买的数据。 报告器可以在不初始化AppMetrica SDK的情况下工作。
步骤 1. (可选) 使用扩展配置初始化报告器
要用扩展配置初始化报告器,请创建一个ReporterConfig类对象,设置需要的参数,然后使用AppMetrica.activateReporter(Context context, ReporterConfig config)方法激活报告器。 此配置用于具有指定 API 密钥的报告员。 您可以为每个额外的 API 密钥设置自己的配置。
在第一次调用报告器之前,应先初始化具有扩展配置的报告器。 否则,报告器将在没有配置的情况下初始化。
// Creating extended configuration of the reporter.
// To create it, pass a ANOTHER_API_KEY that is different from the app's API_KEY.
val reporterConfig = ReporterConfig.newConfigBuilder(ANOTHER_API_KEY)
    // Setting up the configuration. For example, to enable logging.
    .withLogs()
    // ...
    .build()
// Initializing a reporter.
AppMetrica.activateReporter(applicationContext, reporterConfig)
// Creating extended configuration of the reporter.
// To create it, pass a ANOTHER_API_KEY that is different from the app's API_KEY.
ReporterConfig reporterConfig = ReporterConfig.newConfigBuilder(ANOTHER_API_KEY)
        // Setting up the configuration. For example, to enable logging.
        .withLogs()
        // ...
        .build();
// Initializing a reporter.
AppMetrica.activateReporter(getApplicationContext(), reporterConfig);
步骤 2. 配置使用报告器发送数据
要使用报告器发送数据,请通过 AppMetrica.getReporter(Context context, String apiKey) 方法获取实现 IReporter 接口的对象,然后使用接口方法发送报告。 如果报告器没有用扩展配置进行初始化,调用此方法将会为指定的 API 密钥初始化报告器。
事件发送示例:
AppMetrica.getReporter(applicationContext, ANOTHER_API_KEY).reportEvent("Updates installed")
AppMetrica.getReporter(getApplicationContext(), ANOTHER_API_KEY).reportEvent("Updates installed");
为了正确追踪,请手动配置报告器,使每个报告器发送会话开始和暂停的事件。 使用 resumeSession() 和 pauseSession() 方法在 IReporter 接口中实现 onResume() 和 onPause() 用于你的 Activity:
public class YourActivity : Activity() {
    override fun onResume() {
        super.onResume()
        AppMetrica.getReporter(applicationContext, ANOTHER_API_KEY).resumeSession()
    }

    override fun onPause() {
        AppMetrica.getReporter(applicationContext, ANOTHER_API_KEY).pauseSession()
        super.onPause()
    }
}
public class YourActivity extends Activity {
    @Override
    protected void onResume() {
        super.onResume();
        AppMetrica.getReporter(getApplicationContext(), ANOTHER_API_KEY).resumeSession();
    }

    @Override
    protected void onPause() {
        AppMetrica.getReporter(getApplicationContext(), ANOTHER_API_KEY).pauseSession();
        super.onPause();
    }
}
跟踪应用崩溃
应用程序崩溃的报告默认会被发送。
要禁用自动监控,请用禁止发送崩溃报告的配置初始化库。 要做到这一点,在创建扩展库配置时,将 false 值传递给 withLocationTracking(boolean enabled) 方法。
// Creating an extended library configuration.
val config = AppMetrica.newConfigBuilder(API_KEY)
    // Disabling the data sending about the app crashes.
    .withCrashReporting(false)
    .build()
// Initializing the AppMetrica SDK.
AppMetrica.activate(applicationContext, config)
// Creating an extended library configuration.
AppMetricaConfig config = AppMetricaConfig.newConfigBuilder(API_KEY)
        // Disabling the data sending about the app crashes.
        .withCrashReporting(false)
        .build();
// Initializing the AppMetrica SDK.
AppMetrica.activate(getApplicationContext(), config);
如果自动监控被禁用,您可以手动提交崩溃信息。
手动监控应用崩溃
应用程序崩溃的报告默认会被发送。 为了避免在手动发送崩溃时事件重复,请禁用应用崩溃的自动监控。
要手动发送崩溃数据,请使用 AppMetrica.reportUnhandledException(Throwable exception) 方法。
val previousUncaughtExceptionHandler = Thread.getDefaultUncaughtExceptionHandler()
// Creating a new handler.
val uncaughtExceptionHandler = Thread.UncaughtExceptionHandler { thread, exception ->
    try {
        // Sending a message about an app crash to the AppMetrica server.
        AppMetrica.reportUnhandledException(exception)
    } finally {
        // Sending a message about an app crash to the system handler.
        previousUncaughtExceptionHandler?.uncaughtException(thread, exception)
    }
}
// Setting the default handler.
Thread.setDefaultUncaughtExceptionHandler(uncaughtExceptionHandler)
final Thread.UncaughtExceptionHandler previousUncaughtExceptionHandler = Thread.getDefaultUncaughtExceptionHandler();
// Creating a new handler.
Thread.UncaughtExceptionHandler uncaughtExceptionHandler = new Thread.UncaughtExceptionHandler() {
    @Override
    public void uncaughtException(Thread thread, Throwable exception) {
        try {
            // Sending a message about an app crash to the AppMetrica server.
            AppMetrica.reportUnhandledException(exception);
        } finally {
            // Sending a message about an app crash to the system handler.
            if (previousUncaughtExceptionHandler != null) {
                previousUncaughtExceptionHandler.uncaughtException(thread, exception);
            }
        }
    }
};
// Setting the default handler.
Thread.setDefaultUncaughtExceptionHandler(uncaughtExceptionHandler);
监控原生应用崩溃
如果在项目中添加了库的SO文件,报告会在原生应用崩溃时自动发送。
默认情况下,SO 文件被忽略。
要添加它们,请按以下方式配置AppMetrica Gradle Plugin:
appmetrica {
    ...
    ndk {
        enable = { applicationVariant -> true }
    }
}
appmetrica {
    ...
    ndk {
        enable = { applicationVariant -> true }
    }
}
插件会自动添加适当的依赖。
插件添加的库包含每种平台的SO文件(arm、armv7、mips、x86)。
使用abi splits来排除不需要的SO文件。
如果您不使用 Gradle
下载并将库添加到你的项目中。
要禁用自动监控,请用禁止发送崩溃报告的配置初始化库。
要做到这一点,在创建扩展库配置时,将 false 值传递给 withNativeCrashReporting(boolean enabled) 方法。
// Creating an extended library configuration.
val config = AppMetricaConfig.newConfigBuilder(API_KEY)
    // Disabling the data sending about the native app crashes.
    .withNativeCrashReporting(false)
    .build()
// Initializing the AppMetrica SDK.
AppMetrica.activate(applicationContext, config)
// Creating an extended library configuration.
AppMetricaConfig config = AppMetricaConfig.newConfigBuilder(API_KEY)
        // Disabling the data sending about the native app crashes.
        .withNativeCrashReporting(false)
        .build();
// Initializing the AppMetrica SDK.
AppMetrica.activate(getApplicationContext(), config);
使用库发送广告标识符
广告标识符默认随事件一起发送。
要了解有关管理广告标识符的更多信息,请参见获取广告 ID。
如果您想禁用收集跟踪标识符(例如在等待用户同意时),可以在初始化库的过程中进行设置。 要做到这一点,在创建配置时,将 false 值传递给 withAdvIdentifiersTracking (boolean enabled) 方法。
// Creating an extended library configuration.
val config = AppMetricaConfig.newConfigBuilder(API_KEY)
    // Disabling advertising identifiers tracking
    .withAdvIdentifiersTracking(false)
    .build()
// Initializing the AppMetrica SDK.
AppMetrica.activate(applicationContext, config)
// Creating an extended library configuration.
AppMetricaConfig config = AppMetricaConfig.newConfigBuilder(API_KEY)
        // Disabling advertising identifiers tracking
        .withAdvIdentifiersTracking(false)
        .build();
// Initializing the AppMetrica SDK.
AppMetrica.activate(getApplicationContext(), config);
在获得用户同意后,我们建议在应用程序运行时启用收集广告标识符。 要做到这一点,请将 true 传递给 AppMetrica.setAdvIdentifiersTracking(boolean enabled) 方法。
// Enabling advertising identifiers tracking
AppMetrica.setAdvIdentifiersTracking(true)
// Enabling advertising identifiers tracking
AppMetrica.setAdvIdentifiersTracking(true);
使用库发送设备位置
默认情况下,发送设备位置已禁用。
从版本 5.0.0 开始,AppMetrica SDK 默认禁用 locationTracking。
要启用发送功能,请用配置初始化库,其中已启用发送设备位置数据。 要做到这一点,在创建扩展库配置时,将 true 值传递给 withLocationTracking(boolean enabled) 方法。
// Creating an extended library configuration.
val config = AppMetricaConfig.newConfigBuilder(API_KEY)
    // Enabling the data sending about the device location.
    .withLocationTracking(true)
    .build()
// Initializing the AppMetrica SDK.
AppMetrica.activate(applicationContext, config)
// Creating an extended library configuration.
AppMetricaConfig config = AppMetricaConfig.newConfigBuilder(API_KEY)
        // Enabling the data sending about the device location.
        .withLocationTracking(true)
        .build();
// Initializing the AppMetrica SDK.
AppMetrica.activate(getApplicationContext(), config);
要在应用运行时启用发送,请使用 AppMetrica.setLocationTracking(boolean enabled) 方法:
AppMetrica.setLocationTracking(true)
AppMetrica.setLocationTracking(true);
为了更精确的定位,请在 AndroidManifest.xml 文件中添加以下权限之一:
- android.permission.ACCESS_COARSE_LOCATION — 用于粗略定位。
- android.permission.ACCESS_FINE_LOCATION — 用于精确定位。
例如:
<manifest>
    <uses-permission android:name="android.permission.ACCESS_COARSE_LOCATION"/>
    <application>...</application>
</manifest>
手动设置位置
在发送设备位置的自定义信息之前,请确保已启用报告功能。
库会自行确定设备位置。 要发送设备位置的自定义数据,请将 android.location.Location 类的实例传递给 AppMetrica.setLocation(Location Location) 方法。
// Determining the location.
val currentLocation = ...
// Setting your own location information of the device.
AppMetrica.setLocation(currentLocation)
// Determining the location.
Location currentLocation = ...;
// Setting your own location information of the device.
AppMetrica.setLocation(currentLocation);
要通过启动配置发送自身设备的位置信息,在创建扩展库配置时,将android.location.Location实例传递给withLocation(Location Location)方法。
// Determining the location.
val currentLocation = ...

// Creating an extended library configuration.
AppMetricaConfig config = AppMetricaConfig.newConfigBuilder(API_KEY)
    // Set your own location information of the device.
    .withLocation(currentLocation)
    .build()
// Initializing the AppMetrica SDK.
AppMetrica.activate(applicationContext, config)
// Determining the location.
Location currentLocation = ...;

// Creating an extended library configuration.
AppMetricaConfig config = AppMetricaConfig.newConfigBuilder(API_KEY)
        // Set your own location information of the device.
        .withLocation(currentLocation)
        .build();
// Initializing the AppMetrica SDK.
AppMetrica.activate(getApplicationContext(), config);
要恢复库的位置检测,请将 null 值传递给 AppMetrica.setLocation(Location location) 方法,并配置 设备位置数据传输。
AppMetrica.setLocation(null)
AppMetrica.setLocation(null);
发送自定义事件
要发送自定义事件(不包含嵌套参数),请将事件的短名称或描述传递给 AppMetrica.reportEvent(String eventName) 方法:
AppMetrica.reportEvent("Updates installed")
AppMetrica.reportEvent("Updates installed");
发送自定义事件(包含嵌套参数)
SDK AppMetrica 允许您发送自定义事件,这些事件可以包含嵌套参数,参数可以设置为 JSON 格式或属性集(Map)。
JSON
要传递嵌套的事件参数(JSON 格式),请使用 AppMetrica.reportEvent(String eventName, String jsonValue) 方法:
val eventParameters = """{"name":"Alice", "age":"18"}"""

AppMetrica.reportEvent("New person", eventParameters)
String eventParameters = "{\"name\":\"Alice\", \"age\":\"18\"}";

AppMetrica.reportEvent("New person", eventParameters);
地图
要发送自定义事件消息作为属性集(Map),请使用AppMetrica.reportEvent(String eventName, Map<String, Object> attributes) 方法:
val eventParameters = mapOf("name" to "Alice", "age" to 18)

AppMetrica.reportEvent("New person", eventParameters)
Map<String, Object> eventParameters = new HashMap<String, Object>();
eventParameters.put("name", "Alice");
eventParameters.put("age", 18);

AppMetrica.reportEvent("New person", eventParameters);
网页界面AppMetrica显示事件最多五级嵌套。 如果事件有六级或更高级别,报告中只显示前五级。 您可以使用Reporting API导出最多十个级别。
要了解有关事件的更多信息,请参见事件。
从 WebView 的 JavaScript 代码发送事件
该 AppMetrica SDK 允许您从 JavaScript 代码发送客户端事件。 通过调用 initWebViewReporting 方法初始化发送:
val webView = findViewById<WebView>(R.id.myWebView)
// do your initialization here
webView.settings.javaScriptEnabled = true
AppMetrica.initWebViewReporting(webView)
webView.loadUrl(myURL)
WebView webView = (WebView) findViewById(R.id.myWebView);
// do your initialization here
webView.getSettings().setJavaScriptEnabled(true);
AppMetrica.initWebViewReporting(webView);
webView.loadUrl(myURL);
在调用 initWebViewReporting 方法后、在调用 setJavaScriptEnabled 方法之前,调用 loadUrl。
要从 JavaScript 代码发送事件,请在 AppMetrica 接口中使用 reportEvent(name, value) 方法:
JavaScript
function buttonClicked() {
  AppMetrica.reportEvent('Button clicked!', '{}');
}
reportEvent 方法的参数:
名称: 一个字符串。 不能为空。值:一个JSON字符串。 可以为 null。
发送自定义错误消息
要发送自定义的错误消息,请使用以下方法:
AppMetrica.报告错误(String message, Throwable error)AppMetrica.reportError(字符串 groupIdentifier, 字符串 message)AppMetrica.报告错误(String groupIdentifier, String message, Throwable error)
带有 groupIdentifier 的示例
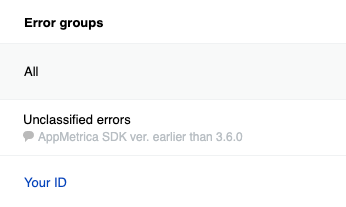
如果你使用带有 groupIdentifier 的方法发送错误,它们会按 ID 分组。
try {
    "00xffWr0ng".toInt()
} catch (error: Throwable) {
    AppMetrica.reportError("Your ID", "Error while parsing some integer number", error)
}
try {
    Integer.valueOf("00xffWr0ng");
} catch (Throwable error) {
    AppMetrica.reportError("Your ID", "Error while parsing some integer number", error);
}
不要使用变量值作为分组 ID。 否则,组的数量会增加,分析起来就会变得困难。
带有消息的示例
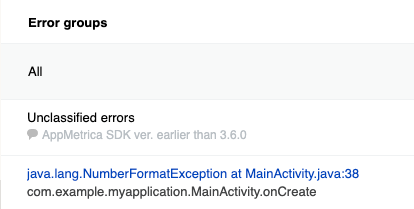
如果使用 AppMetrica.reportError(String message, Throwable error) 方法发送错误,它们会按照 堆栈跟踪 分组。
try {
    "00xffWr0ng".toInt()
} catch (error: Throwable) {
    AppMetrica.reportError("Error while parsing some integer number", error)
}
try {
    Integer.valueOf("00xffWr0ng");
} catch (Throwable error) {
    AppMetrica.reportError("Error while parsing some integer number", error);
}
从缓冲区发送事件
AppMetrica SDK 不会在事件发生后立即发送事件。 库存放事件数据在缓冲区中。 The SendEventsBuffer 方法会启动从缓冲区发送数据并清空缓冲区。 使用该方法在用户场景的重要检查点之后强制发送已存储的事件。
AppMetrica.sendEventsBuffer()
AppMetrica.sendEventsBuffer();
如果您经常使用此方法,可能会导致互联网流量和电力消耗增加。
Sending ProfileId
如果您在初始化 AppMetrica SDK 前已知用户资料 ID,请在初始化前传递它 (setUserProfileID) 或在使用扩展配置进行初始化时传递 (withUserProfileID)。
否则,使用 ID appmetrica_device_id 创建用户配置文件。
AppMetrica 在网页界面中不会显示 预定义属性,如果未配置 ProfieId 发送。
您可以在任何时候通过调用 ProfileId 来更新 setUserProfileID:
AppMetrica.setUserProfileID("id")
AppMetrica.setUserProfileID("id");
发送个人资料属性
要发送用户属性,请将必要的属性传递给 UserProfile 类的实例,然后使用 AppMetrica.reportUserProfile(UserProfile profile) 方法发送实例。 要创建个人属性,请使用 Attribute 类的方法。
// Creating the UserProfile instance.
val userProfile = UserProfile.newBuilder()
    // Updating predefined attributes.
    .apply(Attribute.name().withValue("John"))
    .apply(Attribute.gender().withValue(GenderAttribute.Gender.MALE))
    .apply(Attribute.birthDate().withAge(24))
    .apply(Attribute.notificationsEnabled().withValue(false))
    // Updating custom attributes.
    .apply(Attribute.customString("string_attribute").withValue("string"))
    .apply(Attribute.customNumber("number_attribute").withValue(55.0))
    .apply(Attribute.customCounter("counter_attribute").withDelta(1.0))
    .build()
// Setting the ProfileID using the method of the AppMetrica class.
AppMetrica.setUserProfileID("id")

// Sending the UserProfile instance.
AppMetrica.reportUserProfile(userProfile)
// Creating the UserProfile instance.
UserProfile userProfile = UserProfile.newBuilder()
        // Updating predefined attributes.
        .apply(Attribute.name().withValue("John"))
        .apply(Attribute.gender().withValue(GenderAttribute.Gender.MALE))
        .apply(Attribute.birthDate().withAge(24))
        .apply(Attribute.notificationsEnabled().withValue(false))
        // Updating custom attributes.
        .apply(Attribute.customString("string_attribute").withValue("string"))
        .apply(Attribute.customNumber("number_attribute").withValue(55))
        .apply(Attribute.customCounter("counter_attribute").withDelta(1))
        .build();
// Setting the ProfileID using the method of the AppMetrica class.
AppMetrica.setUserProfileID("id");

// Sending the UserProfile instance.
AppMetrica.reportUserProfile(userProfile);
发送用户个人资料属性,使用第一方数据
第一方数据包括电话号码、电子邮箱地址和 Telegram 账户登录名。 在发送这些数据时,会使用 SHA-256 进行规范化和哈希处理,这意味着数据不会传输到服务器,也无法从已发送的哈希值中恢复。
// Creating the UserProfile instance.
val userProfile = UserProfile.newBuilder()
    // Phone numbers
    .apply(Attribute.phoneHash().withPhoneValues("+0123456789", "+9876543210"))
    // Emails
    .apply(Attribute.emailHash().withEmailValues("firstemailexample@appmetrica.io","secondemailexample@appmetrica.io"))
    // Telegram login
    .apply(Attribute.telegramLoginHash().withTelegramLoginValues("first example login", "second example login"))
    .build()

// Sending the UserProfile instance.
AppMetrica.reportUserProfile(userProfile)
// Creating the UserProfile instance.
UserProfile userProfile = UserProfile.newBuilder()
        // Phone numbers
        .apply(Attribute.phoneHash().withPhoneValues("+0123456789", "+9876543210"))
        // Emails
        .apply(Attribute.emailHash().withEmailValues("firstemailexample@appmetrica.io","secondemailexample@appmetrica.io"))
        // Telegram login
        .apply(Attribute.telegramLoginHash().withTelegramLoginValues("first example login", "second example login"))
        .build();

// Sending the UserProfile instance.
AppMetrica.reportUserProfile(userProfile);
发送电子商务事件
AppMetrica 不允许将电商事件分为测试事件和非测试事件。 如果你使用主 API 密钥调试购买,测试事件会被包含在总体统计中。 因此,要调试电商事件发送,请使用报告器将统计数据发送到额外的API密钥。
步骤 1. 配置将电子商务事件发送到测试 API 密钥
对于不同的用户操作,存在相应的电商事件类型。 要创建特定的事件类型,请使用适当的ECommerceEvent类方法。
下面的示例展示了如何发送特定类型的事件:
打开页面
val payload = mapOf(
    "configuration" to "landscape",
    "full_screen" to "true",
)
// Creating a screen object.
val screen = ECommerceScreen()
    .setCategoriesPath(listOf("Promos", "Hot deal")) // Optional.
    .setName("ProductCardActivity") // Optional.
    .setSearchQuery("danissimo maple syrup") // Optional.
    .setPayload(payload) // Optional.
val showScreenEvent = ECommerceEvent.showScreenEvent(screen)
// Sending an e-commerce event.
AppMetrica.getReporter(applicationContext, "Testing API key").reportECommerce(showScreenEvent)
Map<String, String> payload = new HashMap<>();
payload.put("configuration", "landscape");
payload.put("full_screen", "true");
// Creating a screen object.
CommerceScreen screen = new ECommerceScreen()
        .setCategoriesPath(Arrays.asList("Promos", "Hot deal")) // Optional.
        .setName("ProductCardActivity") // Optional.
        .setSearchQuery("danissimo maple syrup") // Optional.
        .setPayload(payload); // Optional.
ECommerceEvent showScreenEvent = ECommerceEvent.showScreenEvent(screen);
// Sending an e-commerce event.
AppMetrica.getReporter(getApplicationContext(), "Testing API key").reportECommerce(showScreenEvent);
查看产品资料
val payload = mapOf(
    "configuration" to "landscape",
    "full_screen" to "true",
)
// Creating a screen object.
val screen = ECommerceScreen()
    .setCategoriesPath(listOf("Promos", "Hot deal")) // Optional.
    .setName("ProductCardActivity") // Optional.
    .setSearchQuery("danissimo maple syrup") // Optional.
    .setPayload(payload) // Optional.
// Creating an actualPrice object.
val actualPrice = ECommercePrice(ECommerceAmount(4.53, "USD"))
    .setInternalComponents(listOf( // Optional.
        ECommerceAmount(30570000, "wood"),
        ECommerceAmount(26.89, "iron"),
        ECommerceAmount(BigDecimal("5.1"), "gold")
    ))
// Creating an originalPrice object.
val originalPrice = ECommercePrice(ECommerceAmount(5.78, "USD"))
    .setInternalComponents(listOf( // Optional.
        ECommerceAmount(30590000, "wood"),
        ECommerceAmount(26.92, "iron"),
        ECommerceAmount(BigDecimal("5.5"), "gold")
    ))
// Creating a product object.
val product = ECommerceProduct("779213")
    .setActualPrice(actualPrice) // Optional.
    .setPromocodes(listOf("BT79IYX", "UT5412EP")) // Optional.
    .setPayload(payload) // Optional.
    .setOriginalPrice(originalPrice) // Optional.
    .setName("Danissimo curd product 5.9%, 130 g") // Optional.
    .setCategoriesPath(listOf("Groceries", "Dairy products", "Yogurts")) // Optional.
val showProductCardEvent = ECommerceEvent.showProductCardEvent(product, screen)
// Sending an e-commerce event.
AppMetrica.getReporter(applicationContext, "Testing API key").reportECommerce(showProductCardEvent)
Map<String, String> payload = new HashMap<>();
payload.put("configuration", "landscape");
payload.put("full_screen", "true");
// Creating a screen object.
ECommerceScreen screen = new ECommerceScreen()
        .setCategoriesPath(Arrays.asList("Promos", "Hot deal")) // Optional.
        .setName("ProductCardActivity") // Optional.
        .setSearchQuery("danissimo maple syrup") // Optional.
        .setPayload(payload); // Optional.
// Creating an actualPrice object.
ECommercePrice actualPrice = new ECommercePrice(new ECommerceAmount(4.53, "USD"))
        .setInternalComponents(Arrays.asList( // Optional.
                new ECommerceAmount(30_570_000, "wood"),
                new ECommerceAmount(26.89, "iron"),
                new ECommerceAmount(new BigDecimal("5.1"), "gold")
        ));
// Creating an originalPrice object.
ECommercePrice originalPrice = new ECommercePrice(new ECommerceAmount(5.78, "USD"))
        .setInternalComponents(Arrays.asList( // Optional.
                new ECommerceAmount(30_590_000, "wood"),
                new ECommerceAmount(26.92, "iron"),
                new ECommerceAmount(new BigDecimal("5.5"), "gold")
        ));
// Creating a product object.
ECommerceProduct product = new ECommerceProduct("779213")
        .setActualPrice(actualPrice) // Optional.
        .setPromocodes(Arrays.asList("BT79IYX", "UT5412EP")) // Optional.
        .setPayload(payload) // Optional.
        .setOriginalPrice(originalPrice) // Optional.
        .setName("Danissimo curd product 5.9%, 130 g") // Optional.
        .setCategoriesPath(listOf("Groceries", "Dairy products", "Yogurts")) // Optional.
ECommerceEvent showProductCardEvent = ECommerceEvent.showProductCardEvent(product, screen);
// Sending an e-commerce event.
AppMetrica.getReporter(getApplicationContext(), "Testing API key").reportECommerce(showProductCardEvent);
查看产品页面
val payload = mapOf(
    "configuration" to "landscape",
    "full_screen" to "true",
)
// Creating a screen object.
val screen = ECommerceScreen()
    .setCategoriesPath(listOf("Promos", "Hot deal")) // Optional.
    .setName("ProductCardActivity") // Optional.
    .setSearchQuery("danissimo maple syrup") // Optional.
    .setPayload(payload) // Optional.
// Creating an actualPrice object.
val actualPrice = ECommercePrice(ECommerceAmount(4.53, "USD"))
    .setInternalComponents(listOf( // Optional.
        ECommerceAmount(30570000, "wood"),
        ECommerceAmount(26.89, "iron"),
        ECommerceAmount(BigDecimal("5.1"), "gold")
    ))
// Creating an originalPrice object.
val originalPrice = ECommercePrice(ECommerceAmount(5.78, "USD"))
    .setInternalComponents(listOf( // Optional.
        ECommerceAmount(30590000, "wood"),
        ECommerceAmount(26.92, "iron"),
        ECommerceAmount(BigDecimal("5.5"), "gold")
    ))
// Creating a product object.
val product = ECommerceProduct("779213")
    .setActualPrice(actualPrice) // Optional.
    .setPromocodes(listOf("BT79IYX", "UT5412EP")) // Optional.
    .setPayload(payload) // Optional.
    .setOriginalPrice(originalPrice) // Optional.
    .setName("Danissimo curd product 5.9%, 130 g") // Optional.
    .setCategoriesPath(listOf("Groceries", "Dairy products", "Yogurts")) // Optional.
// Creating a referrer object.
val referrer = ECommerceReferrer()
    .setType("button") // Optional.
    .setIdentifier("76890") // Optional.
    .setScreen(screen) // Optional.
val showProductDetailsEvent = ECommerceEvent.showProductDetailsEvent(product, referrer) // Referrer is optional — can be null.
// Sending an e-commerce event.
AppMetrica.getReporter(applicationContext, "Testing API key").reportECommerce(showProductDetailsEvent)
Map<String, String> payload = new HashMap<>();
payload.put("configuration", "landscape");
payload.put("full_screen", "true");
// Creating a screen object.
ECommerceScreen screen = new ECommerceScreen()
        .setCategoriesPath(Arrays.asList("Promos", "Hot deal")) // Optional.
        .setName("ProductCardActivity") // Optional.
        .setSearchQuery("danissimo maple syrup") // Optional.
        .setPayload(payload); // Optional.
// Creating an actualPrice object.
ECommercePrice actualPrice = new ECommercePrice(new ECommerceAmount(4.53, "USD"))
        .setInternalComponents(Arrays.asList( // Optional.
                new ECommerceAmount(30_570_000, "wood"),
                new ECommerceAmount(26.89, "iron"),
                new ECommerceAmount(new BigDecimal("5.1"), "gold")
        ));
// Creating an originalPrice object.
ECommercePrice originalPrice = new ECommercePrice(new ECommerceAmount(5.78, "USD"))
        .setInternalComponents(Arrays.asList( // Optional.
                new ECommerceAmount(30_590_000, "wood"),
                new ECommerceAmount(26.92, "iron"),
                new ECommerceAmount(new BigDecimal("5.5"), "gold")
        ));
// Creating a product object.
ECommerceProduct product = new ECommerceProduct("779213")
        .setActualPrice(actualPrice) // Optional.
        .setPromocodes(Arrays.asList("BT79IYX", "UT5412EP")) // Optional.
        .setPayload(payload) // Optional.
        .setOriginalPrice(originalPrice) // Optional.
        .setName("Danissimo curd product 5.9%, 130 g") // Optional.
        .setCategoriesPath(listOf("Groceries", "Dairy products", "Yogurts")) // Optional.
// Creating a referrer object.
ECommerceReferrer referrer = new ECommerceReferrer()
        .setType("button") // Optional.
        .setIdentifier("76890") // Optional.
        .setScreen(screen); // Optional.
ECommerceEvent showProductDetailsEvent = ECommerceEvent.showProductDetailsEvent(product, referrer); // Referrer is optional — can be null.
// Sending an E-commerce event.
AppMetrica.getReporter(getApplicationContext(), "Testing API key").reportECommerce(showProductDetailsEvent);
将物品添加到购物车或从购物车中移除
val payload = mapOf(
    "configuration" to "landscape",
    "full_screen" to "true",
)
// Creating a screen object.
val screen = ECommerceScreen()
    .setCategoriesPath(listOf("Promos", "Hot deal")) // Optional.
    .setName("ProductCardActivity") // Optional.
    .setSearchQuery("danissimo maple syrup") // Optional.
    .setPayload(payload) // Optional.
// Creating an actualPrice object.
val actualPrice = ECommercePrice(ECommerceAmount(4.53, "USD"))
    .setInternalComponents(listOf( // Optional.
        ECommerceAmount(30570000, "wood"),
        ECommerceAmount(26.89, "iron"),
        ECommerceAmount(BigDecimal("5.1"), "gold")
    ))
// Creating an originalPrice object.
val originalPrice = ECommercePrice(ECommerceAmount(5.78, "USD"))
    .setInternalComponents(listOf( // Optional.
        ECommerceAmount(30590000, "wood"),
        ECommerceAmount(26.92, "iron"),
        ECommerceAmount(BigDecimal("5.5"), "gold")
    ))
// Creating a product object.
val product = ECommerceProduct("779213")
    .setActualPrice(actualPrice) // Optional.
    .setPromocodes(listOf("BT79IYX", "UT5412EP")) // Optional.
    .setPayload(payload) // Optional.
    .setOriginalPrice(originalPrice) // Optional.
    .setName("Danissimo curd product 5.9%, 130 g") // Optional.
    .setCategoriesPath(listOf("Groceries", "Dairy products", "Yogurts")) // Optional.
// Creating a referrer object.
val referrer = ECommerceReferrer()
    .setType("button") // Optional.
    .setIdentifier("76890") // Optional.
    .setScreen(screen) // Optional.
// Creating a cartItem object.
val addedItems1 = ECommerceCartItem(product, actualPrice, 1.0)
    .setReferrer(referrer) // Optional.
val addCartItemEvent = ECommerceEvent.addCartItemEvent(addedItems1)
// Sending an e-commerce event.
AppMetrica.getReporter(applicationContext, "Testing API key").reportECommerce(addCartItemEvent)
val removeCartItemEvent = ECommerceEvent.removeCartItemEvent(addedItems1)
// Sending an e-commerce event.
AppMetrica.getReporter(applicationContext, "Testing API key").reportECommerce(removeCartItemEvent)
Map<String, String> payload = new HashMap<>();
payload.put("configuration", "landscape");
payload.put("full_screen", "true");
// Creating a screen object.
ECommerceScreen screen = new ECommerceScreen()
        .setCategoriesPath(Arrays.asList("Promos", "Hot deal")) // Optional.
        .setName("ProductCardActivity") // Optional.
        .setSearchQuery("danissimo maple syrup") // Optional.
        .setPayload(payload); // Optional.
// Creating an actualPrice object.
ECommercePrice actualPrice = new ECommercePrice(new ECommerceAmount(4.53, "USD"))
        .setInternalComponents(Arrays.asList( // Optional.
                new ECommerceAmount(30_570_000, "wood"),
                new ECommerceAmount(26.89, "iron"),
                new ECommerceAmount(new BigDecimal("5.1"), "gold")
        ));
// Creating an originalPrice object.
ECommercePrice originalPrice = new ECommercePrice(new ECommerceAmount(5.78, "USD"))
        .setInternalComponents(Arrays.asList( // Optional.
                new ECommerceAmount(30_590_000, "wood"),
                new ECommerceAmount(26.92, "iron"),
                new ECommerceAmount(new BigDecimal("5.5"), "gold")
        ));
// Creating a product object.
ECommerceProduct product = new ECommerceProduct("779213")
        .setActualPrice(actualPrice) // Optional.
        .setPromocodes(Arrays.asList("BT79IYX", "UT5412EP")) // Optional.
        .setPayload(payload) // Optional.
        .setOriginalPrice(originalPrice) // Optional.
        .setName("Danissimo curd product 5.9%, 130 g") // Optional.
        .setCategoriesPath(listOf("Groceries", "Dairy products", "Yogurts")) // Optional.
// Creating a referrer object.
ECommerceReferrer referrer = new ECommerceReferrer()
        .setType("button") // Optional.
        .setIdentifier("76890") // Optional.
        .setScreen(screen); // Optional.
// Creating a cartItem object.
ECommerceCartItem addedItems1 = new ECommerceCartItem(product, actualPrice, 1.0)
        .setReferrer(referrer); // Optional.
ECommerceEvent addCartItemEvent = ECommerceEvent.addCartItemEvent(addedItems1);
// Sending an e-commerce event.
AppMetrica.getReporter(getApplicationContext(), "Testing API key").reportECommerce(addCartItemEvent);
ECommerceEvent removeCartItemEvent = ECommerceEvent.removeCartItemEvent(addedItems1);
// Sending an e-commerce event.
AppMetrica.getReporter(getApplicationContext(), "Testing API key").reportECommerce(removeCartItemEvent);
开始并完成购买
val payload = mapOf(
    "configuration" to "landscape",
    "full_screen" to "true",
)
// Creating a screen object.
val screen = ECommerceScreen()
    .setCategoriesPath(listOf("Promos", "Hot deal")) // Optional.
    .setName("ProductCardActivity") // Optional.
    .setSearchQuery("danissimo maple syrup") // Optional.
    .setPayload(payload) // Optional.
// Creating an actualPrice object.
val actualPrice = ECommercePrice(ECommerceAmount(4.53, "USD"))
    .setInternalComponents(listOf( // Optional.
        ECommerceAmount(30570000, "wood"),
        ECommerceAmount(26.89, "iron"),
        ECommerceAmount(BigDecimal("5.1"), "gold")
    ))
// Creating an originalPrice object.
val originalPrice = ECommercePrice(ECommerceAmount(5.78, "USD"))
    .setInternalComponents(listOf( // Optional.
        ECommerceAmount(30590000, "wood"),
        ECommerceAmount(26.92, "iron"),
        ECommerceAmount(BigDecimal("5.5"), "gold")
    ))
// Creating a product object.
val product = ECommerceProduct("779213")
    .setActualPrice(actualPrice) // Optional.
    .setPromocodes(listOf("BT79IYX", "UT5412EP")) // Optional.
    .setPayload(payload) // Optional.
    .setOriginalPrice(originalPrice) // Optional.
    .setName("Danissimo curd product 5.9%, 130 g") // Optional.
    .setCategoriesPath(listOf("Groceries", "Dairy products", "Yogurts")) // Optional.
// Creating a referrer object.
val referrer = ECommerceReferrer()
    .setType("button") // Optional.
    .setIdentifier("76890") // Optional.
    .setScreen(screen) // Optional.
// Creating a cartItem object.
val addedItems1 = ECommerceCartItem(product, actualPrice, 1.0)
    .setReferrer(referrer) // Optional.
// Creating an order object.
val order = ECommerceOrder("88528768", listOf(addedItems1))
    .setPayload(payload) // Optional.
val beginCheckoutEvent = ECommerceEvent.beginCheckoutEvent(order)
// Sending an e-commerce event.
AppMetrica.getReporter(applicationContext, "Testing API key").reportECommerce(beginCheckoutEvent)
val purchaseEvent = ECommerceEvent.purchaseEvent(order)
// Sending an e-commerce event.
AppMetrica.getReporter(applicationContext, "Testing API key").reportECommerce(purchaseEvent)
Map<String, String> payload = new HashMap<>();
payload.put("configuration", "landscape");
payload.put("full_screen", "true");
// Creating a screen object.
ECommerceScreen screen = new ECommerceScreen()
        .setCategoriesPath(Arrays.asList("Promos", "Hot deal")) // Optional.
        .setName("ProductCardActivity") // Optional.
        .setSearchQuery("danissimo maple syrup") // Optional.
        .setPayload(payload); // Optional.
// Creating an actualPrice object.
ECommercePrice actualPrice = new ECommercePrice(new ECommerceAmount(4.53, "USD"))
        .setInternalComponents(Arrays.asList( // Optional.
                new ECommerceAmount(30_570_000, "wood"),
                new ECommerceAmount(26.89, "iron"),
                new ECommerceAmount(new BigDecimal("5.1"), "gold")
        ));
// Creating an originalPrice object.
ECommercePrice originalPrice = new ECommercePrice(new ECommerceAmount(5.78, "USD"))
        .setInternalComponents(Arrays.asList( // Optional.
                new ECommerceAmount(30_590_000, "wood"),
                new ECommerceAmount(26.92, "iron"),
                new ECommerceAmount(new BigDecimal("5.5"), "gold")
        ));
// Creating a product object.
ECommerceProduct product = new ECommerceProduct("779213")
        .setActualPrice(actualPrice) // Optional.
        .setPromocodes(Arrays.asList("BT79IYX", "UT5412EP")) // Optional.
        .setPayload(payload) // Optional.
        .setOriginalPrice(originalPrice) // Optional.
        .setName("Danissimo curd product 5.9%, 130 g") // Optional.
        .setCategoriesPath(listOf("Groceries", "Dairy products", "Yogurts")) // Optional.
// Creating a referrer object.
ECommerceReferrer referrer = new ECommerceReferrer()
        .setType("button") // Optional.
        .setIdentifier("76890") // Optional.
        .setScreen(screen); // Optional.
// Creating a cartItem object.
ECommerceCartItem addedItems1 = new ECommerceCartItem(product, actualPrice, 1.0)
        .setReferrer(referrer); // Optional.
// Creating an order object.
ECommerceOrder order = new ECommerceOrder("88528768", Arrays.asList(addedItems1))
        .setPayload(payload); // Optional.
ECommerceEvent beginCheckoutEvent = ECommerceEvent.beginCheckoutEvent(order);
// Sending an e-commerce event.
AppMetrica.getReporter(getApplicationContext(), "Testing API key").reportECommerce(beginCheckoutEvent);
ECommerceEvent purchaseEvent = ECommerceEvent.purchaseEvent(order);
// Sending an e-commerce event.
AppMetrica.getReporter(getApplicationContext(), "Testing API key").reportECommerce(purchaseEvent);
步骤 2. 查看测试应用的报告
在应用中进行测试购买。 过一会儿,在 AppMetrica 界面检查电商报告。 确保报告显示电商事件。
要了解报告的更多信息,请查看电子商务。
步骤 3. 配置将事件发送到主 API 密钥
测试成功后,配置将电子商务事件发送到主 API 密钥。
要将ECommerceEvent实例发送到主API密钥,请使用AppMetrica.reportECommerce(@NonNull ECommerceEvent event)方法。
// ...
// Sending an e-commerce event.
AppMetrica.reportECommerce(ecommerceEvent)
// ...
// Sending an e-commerce event.
AppMetrica.reportECommerce(ecommerceEvent);
发送收入
AppMetrica 支持使用 Google Play Billing 库验证购买。 验证功能可帮助你过滤来自被篡改应用的购买行为。 如果启用验证且购买未通过验证,该购买不会显示在报告中。
使用公钥进行本地验证,以验证 Android 上的购买操作。 要启用验证,请创建公钥并在设置中指定它。
步骤 1. 配置将收入发送到测试 API 密钥
AppMetrica 不允许你区分测试收入和非测试收入。 如果您使用主 API 密钥调试购买,测试购买会被包含在总体统计中。 因此,要调试收入发送,请使用报告器将统计数据发送到额外的 API 密钥。
此部分介绍将收入发送到额外 API 密钥的步骤:
带验证
要在 Android 上验证购买,请配置发送 Revenue.Receipt 实例以及 Revenue:
- 创建一个
Revenue.Receipt实例,包含购买信息和签名。 创建Revenue实例时必须使用它,在Revenue.Builder.withReceipt (Revenue.Receipt receipt)中。 - 创建
Revenue实例,使用Revenue.Builder构造函数。 - 将
Revenue实例发送到测试API密钥,使用IReporter。 要了解更多关于报告员的信息,请参见将统计数据发送到额外的API密钥。
fun handlePurchase(purchase: Purchase) {
    // Creating the Revenue.Receipt instance.
    // It is used for checking purchases in Google Play.
    val revenueReceipt = Receipt.newBuilder()
        .withData(purchase.originalJson)
        .withSignature(purchase.signature)
        .build()
    // Creating the Revenue instance.
    val revenue = Revenue.newBuilder(99000000, Currency.getInstance("RUB"))
        .withProductID("io.appmetrica.service.299")
        .withQuantity(2)
        .withReceipt(revenueReceipt)
        .withPayload("""{"source":"Google Play"}""")
        .build()
    // Sending the Revenue instance using reporter.
    AppMetrica.getReporter(applicationContext, "Testing API key").reportRevenue(revenue)
}
void handlePurchase(Purchase purchase) {
    // Creating the Revenue.Receipt instance.
    // It is used for checking purchases in Google Play.
    Revenue.Receipt revenueReceipt = Revenue.Receipt.newBuilder()
            .withData(purchase.getOriginalJson())
            .withSignature(purchase.getSignature())
            .build();
    // Creating the Revenue instance.
    Revenue revenue = Revenue.newBuilder(99000000, Currency.getInstance("RUB"))
            .withProductID("io.appmetrica.service.299")
            .withQuantity(2)
            .withReceipt(revenueReceipt)
            .withPayload("{\"source\":\"Google Play\"}")
            .build();
    // Sending the Revenue instance using reporter.
    AppMetrica.getReporter(getApplicationContext(), "Testing API key").reportRevenue(revenue);
}
不带验证
要在不进行验证的情况下发送购买信息:
-
创建
Revenue实例,使用Revenue.Builder构造函数。 -
(可选) 要对购买进行分组,请在
OrderID参数中设置Revenue.Builder.withPayload(String payload)方法。如果没有指定
OrderID,AppMetrica会自动生成ID。 -
将
Revenue实例发送到测试API密钥,使用IReporter. 要了解更多关于报告员的信息,请参见将统计数据发送到额外的 API 密钥。
// Creating the Revenue instance.
val revenue = Revenue.newBuilder(99000000, Currency.getInstance("RUB"))
    .withProductID("io.appmetrica.service.299")
    .withQuantity(2) // Passing the OrderID parameter in the .withPayload(String payload) method to group purchases.
    .withPayload("""{"OrderID":"Identifier", "source":"Google Play"}""")
    .build()
// Sending the Revenue instance using reporter.
AppMetrica.getReporter(applicationContext, "Testing API key").reportRevenue(revenue)
// Creating the Revenue instance.
Revenue revenue = Revenue.newBuilder(99000000, Currency.getInstance("RUB"))
        .withProductID("io.appmetrica.service.299")
        .withQuantity(2)
        // Passing the OrderID parameter in the .withPayload(String payload) method to group purchases.
        .withPayload("{\"OrderID\":\"Identifier\", \"source\":\"Google Play\"}")
        .build();
// Sending the Revenue instance using reporter.
AppMetrica.getReporter(getApplicationContext(), "Testing API key").reportRevenue(revenue);
步骤 2. 查看测试应用的报告
在AppMetrica报告中查看收入报告。 确保购买数量有所增加。
要了解报告的更多信息,请查看应用内收入和广告收入。
步骤 3. 配置将收益发送到主 API 密钥
测试成功后,将Revenue发送到主API密钥。
要将Revenue实例发送到主API密钥,请使用AppMetrica.reportRevenue(Revenue revenue)方法。
// ...
// Sending the Revenue instance.
AppMetrica.reportRevenue(revenue)
// ...
// Sending the Revenue instance.
AppMetrica.reportRevenue(revenue);
发送广告收入
AppMetrica 提供了几种从广告盈利和广告中介服务发送广告收入数据的选项:
自动集成
数据会自动传输。 您可以在适当情况下禁用自动收集数据。
ironSource
步骤 1. 设置发送广告收入数据
IronSource 支持自动收集广告收入数据。 该过程由 io.appmetrica.analytics:analytics-ad-revenue-ironsource-v7 模块管理。
激活示例:
AppMetricaConfig config = AppMetricaConfig.newConfigBuilder(API_KEY).build();
AppMetrica.activate(context, config);
步骤 2. 确保广告收入数据被包含在报告中
-
在应用中查看广告。
-
确保 应用内和广告收入 报告中广告收入事件的数量与广告浏览数量相同。
禁用自动收集广告收入数据
要禁用广告收入数据的自动收集,请从依赖项列表中排除以下模块:
configurations.configureEach {
    exclude(group = "io.appmetrica.analytics", module = "io.appmetrica.analytics:analytics-ad-revenue-ironsource-v7")
}
configurations.configureEach {
    exclude group: 'io.appmetrica.analytics', module: 'io.appmetrica.analytics:analytics-ad-revenue-ironsource-v7'
}
简化集成
使用简化API发送数据。 它支持流行的广告盈利和中介服务。
Applovin MAX
步骤 1. 确保 SDK 已激活
激活示例:
AppMetricaConfig config = AppMetricaConfig.newConfigBuilder(API_KEY).build();
AppMetrica.activate(context, config);
步骤 2. 设置广告收入数据发送
-
创建适当的广告实例后,使用
MaxAdRevenueListener,通过setRevenueListener方法设置。 -
将来自
onAdRevenuePaid(MaxAd)方法的数据发送到 AppMetrica SDK:调用AppMetrica#reportExternalAdRevenue方法,然后将传递给MaxAd监听器的参数和AppLovinSdk实例作为参数传入。打开应用广告BannerInterstitial本地RewardedKotlinJavaval maxAppOpenAdView = MaxAppOpenAd( "ad-unit-ID", applicationContext) maxAppOpenAdView.setRevenueListener { AppMetrica.reportExternalAdRevenue(it, AppLovinSdk.getInstance(applicationContext)) }MaxAppOpenAd maxAppOpenAd = new MaxAppOpenAd( "ad-unit-ID", getApplicationContext()); maxAppOpenAd.setRevenueListener(maxAdRevenue -> AppMetrica.reportExternalAdRevenue(maxAdRevenue, AppLovinSdk.getInstance(getApplicationContext())));KotlinJavaval maxAdView = MaxAdView("ad-unit-ID", applicationContext) maxAdView.setRevenueListener { AppMetrica.reportExternalAdRevenue(it, AppLovinSdk.getInstance(applicationContext)) }MaxAdView maxAdView = new MaxAdView("ad-unit-ID", getApplicationContext()); maxAdView.setRevenueListener(maxAdRevenue -> AppMetrica.reportExternalAdRevenue(maxAdRevenue, AppLovinSdk.getInstance(getApplicationContext())));KotlinJavaval maxInterstitialAd = MaxInterstitialAd("ad-unit-ID", applicationContext) maxInterstitialAd.setRevenueListener { AppMetrica.reportExternalAdRevenue(it, AppLovinSdk.getInstance(applicationContext)) }MaxInterstitialAd maxInterstitialAd = new MaxInterstitialAd("ad-unit-ID", getApplicationContext()); maxInterstitialAd.setRevenueListener(maxAdRevenue -> AppMetrica.reportExternalAdRevenue(maxAdRevenue, AppLovinSdk.getInstance(getApplicationContext())));KotlinJavaval nativeAdLoader = MaxNativeAdLoader("ad-unit-ID", applicationContext) nativeAdLoader.setRevenueListener { AppMetrica.reportExternalAdRevenue(it, AppLovinSdk.getInstance(applicationContext)) }MaxNativeAdLoader maxNativeAdLoader = new MaxNativeAdLoader("ad-unit-ID", getApplicationContext()); maxNativeAdLoader.setRevenueListener(maxAdRevenue -> AppMetrica.reportExternalAdRevenue(maxAdRevenue, AppLovinSdk.getInstance(getApplicationContext())));KotlinJavaval maxRewardedAd = MaxRewardedAd.getInstance("ad-unit-ID", applicationContext); maxRewardedAd.setRevenueListener { AppMetrica.reportExternalAdRevenue(it, AppLovinSdk.getInstance(applicationContext)) }MaxRewardedAd maxRewardedAd = MaxRewardedAd.getInstance("ad-unit-ID", getApplicationContext()); maxRewardedAd.setRevenueListener(maxAdRevenue -> AppMetrica.reportExternalAdRevenue(maxAdRevenue, AppLovinSdk.getInstance(getApplicationContext())));
步骤 3. 确保广告收益数据被包含在报告中
-
在应用中查看广告。
-
确保 应用内和广告收入 报告中广告收入事件的数量与广告浏览数量相同。
Digital Turbine
步骤 1. 确保 SDK 已激活
激活示例:
AppMetricaConfig config = AppMetricaConfig.newConfigBuilder(API_KEY).build();
AppMetrica.activate(context, config);
步骤 2. 设置广告收入数据发送
-
对于必需的广告类型(
Banner、Interstitial和Rewarded),请设置对应的监听器(BannerListener、InterstitalListener或RewardedListener)。 -
设置发送
impressionData从监听器的onShow方法到 AppMetrica SDK,使用AppMetrica#reportExternalAdRevenue()方法.BannerInterstitialRewardedKotlinJavaBanner.setBannerListener(object:BannerListener { //.... override fun onShow(placementId: String, impressionData: ImpressionData) { AppMetrica.reportAdRevenue(impressionData) //..... } //.... })Banner.setBannerListener(new BannerListener() { //...... @Override public void onShow(@NonNull String s, @NonNull ImpressionData impressionData) { AppMetrica.reportExternalAttribution(impressionData); //...... } //...... });KotlinJavaInterstitial.setInterstitialListener(object:InterstitialListener { //.... override fun onShow(placementId: String, impressionData: ImpressionData) { AppMetrica.reportExternalAdRevenue(impressionData) //.... } //.... })Interstitial.setInterstitialListener(new InterstitialListener() { //...... @Override public void onShow(@NonNull String s, @NonNull ImpressionData impressionData) { AppMetrica.reportExternalAdRevenue(impressionData); //...... } //....... });KotlinJavaRewarded.setRewardedListener(object:RewardedListener { override fun onShow(placementId: String, impressionData: ImpressionData) { AppMetrica.reportExternalAdRevenue(impressionData); //....... } })Rewarded.setRewardedListener(new RewardedListener() { //..... @Override public void onShow(@NonNull String s, @NonNull ImpressionData impressionData) { AppMetrica.reportExternalAdRevenue(impressionData); //...... } //..... });
步骤 3. 确保广告收益数据被包含在报告中
-
在应用中查看广告。
-
确保 应用内和广告收入 报告中广告收入事件的数量与广告浏览数量相同。
Google AdMob
步骤 1. 确保 SDK 已激活
激活示例:
AppMetricaConfig config = AppMetricaConfig.newConfigBuilder(API_KEY).build();
AppMetrica.activate(context, config);
步骤 2. 设置广告收入数据发送
-
在广告加载监听器的
AppOpenAdLoadCallback#onAdLoaded方法中,设置OnPaidEventListener监听器。 -
在
OnPaidEventListener#onPaidEvent方法中,设置使用AppMetrica#reportExternalAdRevenue()方法向 AppMetrica 发送数据,并将获得的AdValue和AppOpenAd实例作为参数传递。KotlinJavaAppOpenAd.load( this, "ad-unit-ID", adRequest, AppOpenAd.APP_OPEN_AD_ORIENTATION_PORTRAIT, object : AppOpenAdLoadCallback() { override fun onAdLoaded(adMobAppOpenAd: AppOpenAd) { super.onAdLoaded(adMobAppOpenAd) adMobAppOpenAd.onPaidEventListener = OnPaidEventListener { adValue -> AppMetrica.reportExternalAdRevenue( adValue, adMobAppOpenAd ) //...... } //...... } })AppOpenAd.load( this, "ad-unit-ID", adRequest, AppOpenAd.APP_OPEN_AD_ORIENTATION_PORTRAIT, new RewardedInterstitialAdLoadCallback() { @Override public void onAdLoaded(@NonNull AppOpenAd adMobAppOpenAd) { super.onAdLoaded(adMobAppOpenAd); adMobAppOpenAd.setOnPaidEventListener(adValue -> { AppMetrica.reportExternalAdRevenue(adValue, adMobAppOpenAd); //...... }); //...... } });
-
在创建
adView后、加载广告前,调用setOnPaidEventListener方法来注册OnPaidEventListener. -
在
OnPaidEventListener#onPaidEvent方法中,设置向 AppMetrica 发送数据,使用AppMetrica#reportExternalAdRevenue()方法,并将获得的AdValue和adView实例作为参数传递。KotlinJavaval adMobAdView = AdView(this) //........ adMobAdView.setOnPaidEventListener { AppMetrica.reportExternalAdRevenue(it, adMobAdView) //....... } //........ adMobAdView.loadAd(adRequest)AdView adMobAdView = new AdView(this); //...... adMobAdView.setOnPaidEventListener(adValue -> { AppMetrica.reportExternalAdRevenue(adValue, adMobAdView); //....... }); //....... adMobAdView.loadAd(adRequest);
-
在广告加载监听器的
InterstitialAdLoadCallback#onAdLoaded方法中,设置OnPaidEventListener. -
在
OnPaidEventListener#onPaidEvent方法中,设置使用AppMetrica#reportExternalAdRevenue()方法向 AppMetrica 发送数据,并将获得的AdValue和interstitialAd实例作为参数传递。KotlinJavaInterstitialAd.load(this, "add-unit-ID", adRequest, object : InterstitialAdLoadCallback() { //...... override fun onAdLoaded(adMobInterstitalAd: InterstitialAd) { super.onAdLoaded(adMobInterstitalAd) //....... adMobInterstitalAd.setOnPaidEventListener { adValue -> AppMetrica.reportExternalAdRevenue(adValue, adMobInterstitalAd) } //....... } })InterstitialAd.load(this, "ad-unit-ID", adRequest, new InterstitialAdLoadCallback() { //........ @Override public void onAdLoaded(@NonNull InterstitialAd adMobInterstitialAd) { super.onAdLoaded(adMobInterstitialAd); adMobInterstitialAd.setOnPaidEventListener(adValue -> { AppMetrica.reportExternalAdRevenue(adValue, adMobInterstitialAd); //...... }); //...... } });
-
在广告加载监听器的
OnNativeAdLoadedListener#onNativeAdLoaded方法中,设置OnPaidEventListener. -
在
OnPaidEventListener#onPaidEvent方法中,设置向 AppMetrica 发送数据,使用AppMetrica#reportExternalAdRevenue()方法,并将获得的AdValue和nativeAd实例作为参数传递。KotlinJavaval adMobAdLoader = AdLoader.Builder(this, "add-unit-ID") .forNativeAd { adMobNativeAd -> adMobNativeAd.setOnPaidEventListener { adValue -> AppMetrica.reportExternalAdRevenue(adValue, adMobNativeAd) } } //....... .build() //.....//..... AdLoader admobLoader = new AdLoader.Builder(this, "ad-unit-ID") .forNativeAd(adMobNativeAd -> { adMobNativeAd.setOnPaidEventListener(adValue -> { AppMetrica.reportExternalAdRevenue(adValue, adMobNativeAd); //...... }); //...... }) .build(); //......
-
在广告加载监听器的
RewardedAdLoadCallback#onAdLoaded方法中,设置OnPaidEventListener. -
在
OnPaidEventListener#onPaidEvent方法中,设置使用AppMetrica#reportExternalAdRevenue()方法向 AppMetrica 发送数据,并将获得的AdValue和rewardedAd实例作为参数传递。KotlinJava//..... RewardedAd.load(this, "ad-unit-ID", adRequest, object : RewardedAdLoadCallback() { override fun onAdLoaded(rewardedAd: RewardedAd) { super.onAdLoaded(rewardedAd) //..... rewardedAd.onPaidEventListener = OnPaidEventListener { adValue -> AppMetrica.reportExternalAdRevenue( adValue, rewardedAd ) } } }) //.....//..... RewardedAd.load(this, "ad-unit-ID", adRequest, new RewardedAdLoadCallback() { @Override public void onAdLoaded(@NonNull RewardedAd rewardedAd) { super.onAdLoaded(rewardedAd); //..... rewardedAd.setOnPaidEventListener(adValue -> { AppMetrica.reportExternalAdRevenue(adValue, rewardedAd); //........ }); } }); //.....
-
在广告加载监听器的
RewardedInterstitialAdLoadCallback#onAdLoaded方法中,设置OnPaidEventListener. -
在
OnPaidEventListener#onPaidEvent方法中,设置向 AppMetrica 发送数据,使用AppMetrica#reportExternalAdRevenue()方法,并将获得的AdValue和rewardedInterstitialAd实例作为参数传递。KotlinJavaRewardedInterstitialAd.load( this, "ad-unit-ID", adRequest, object : RewardedInterstitialAdLoadCallback() { override fun onAdLoaded(rewardedInterstitialAd: RewardedInterstitialAd) { super.onAdLoaded(rewardedInterstitialAd) rewardedInterstitialAd.onPaidEventListener = OnPaidEventListener { adValue -> AppMetrica.reportExternalAdRevenue( adValue, rewardedInterstitialAd ) //...... } //...... } })RewardedInterstitialAd.load(this, "ad-unit-ID", adRequest, new RewardedInterstitialAdLoadCallback() { @Override public void onAdLoaded(@NonNull RewardedInterstitialAd rewardedInterstitialAd) { super.onAdLoaded(rewardedInterstitialAd); rewardedInterstitialAd.setOnPaidEventListener(adValue -> { AppMetrica.reportExternalAdRevenue(adValue, rewardedInterstitialAd); //...... }); //...... } });
步骤 3. 确保广告收益数据被包含在报告中
-
在应用中查看广告。
-
确保 应用内和广告收入 报告中广告收入事件的数量与广告浏览数量相同。
手动集成和设置
使用此选项手动设置从任何其他广告收益服务(提供展现级收益数据)的数据传输。
步骤 1. 确保 SDK 已激活
激活示例:
AppMetricaConfig config = AppMetricaConfig.newConfigBuilder(API_KEY).build();
AppMetrica.activate(context, config);
步骤 2. 设置广告收入数据发送
-
创建一个
AdRevenue实例,使用AdRevenue.Builder.Map<String, String> adRevenuePayload = new HashMap<>(); adRevenuePayload.put("payload_key_1", "payload_value_1"); adRevenuePayload.put("payload_key_2", "payload_value_2"); AdRevenue adRevenue = AdRevenue.newBuilder(new BigDecimal("100.100"), Currency.getInstance("USD")) .withAdNetwork("ad_network") .withAdPlacementId("ad_placement_id") .withAdPlacementName("ad_placement_name") .withAdType(AdType.NATIVE) .withAdUnitId("ad_unit_id") .withAdUnitName("ad_unit_name") .withPrecision("some precision") .withPayload(adRevenuePayload) .build(); -
发送
Ad Revenue实例,使用AppMetrica.reportAdRevenue(AdRevenue adRevenue)方法。AppMetrica.reportAdRevenue(adRevenue);
步骤 3. 确保广告收益数据被包含在报告中
-
在应用中查看广告。
-
确保 应用内和广告收入 报告中广告收入事件的数量与广告浏览数量相同。
设置会话超时时长
默认情况下,会话超时时间为10秒。 参数sessionTimeout的最小可接受值为10秒。
要更改超时时间,在创建扩展库配置时,将秒数传递给 withSessionTimeout(int sessionTimeout) 方法。
// Creating an extended library configuration.
val config = AppMetricaConfig.newConfigBuilder(API_KEY)
    // Setting the length of the session timeout.
    .withSessionTimeout(15)
    .build()
// Initializing the AppMetrica SDK.
AppMetrica.activate(applicationContext, config)
// Creating an extended library configuration.
AppMetricaConfig config = AppMetricaConfig.newConfigBuilder(API_KEY)
        // Setting the length of the session timeout.
        .withSessionTimeout(15)
        .build();
// Initializing the AppMetrica SDK.
AppMetrica.activate(getApplicationContext(), config);
设置应用版本
默认情况下,应用版本在文件 build.gradle 中设置。
要在代码中指定应用版本,创建扩展库配置时,将应用版本传递给 withAppVersion(String appVersion) 方法。
// Creating an extended library configuration.
val config = AppMetricaConfig.newConfigBuilder(API_KEY)
    // Setting the app version.
    .withAppVersion("1.13.2")
    .build()
// Initializing the AppMetrica SDK.
AppMetrica.activate(applicationContext, config)
// Creating an extended library configuration.
AppMetricaConfig config = AppMetricaConfig.newConfigBuilder(API_KEY)
        // Setting the app version.
        .withAppVersion("1.13.2")
        .build();
// Initializing the AppMetrica SDK.
AppMetrica.activate(getApplicationContext(), config);
where 1.13.2 是应用版本。
确定库的API级别(Android)
要从应用程序代码确定库的 API 级别,请使用 AppMetrica.getLibraryApiLevel() 方法。
val libraryApiLevel = AppMetrica.getLibraryApiLevel()
int libraryApiLevel = AppMetrica.getLibraryApiLevel();
确定库的版本
要从应用程序代码中确定库版本,请使用AppMetrica.getLibraryVersion() 方法:
val libraryVersion = AppMetrica.getLibraryVersion()
String libraryVersion = AppMetrica.getLibraryVersion();
跟踪安装来源
在 AppMetrica SDK 中默认启用跟踪安装来源。
通过深链路跟踪应用打开
要跟踪使用深链的应用打开情况,需要在处理深链的 Activity 中进行修改。 跟踪应用打开是正确跟踪再营销活动的前提条件。
要使用深链,在应用程序中配置它们。
使用 reportAppOpen() 方法来跟踪应用打开:
class DeeplinkActivity : Activity() {
    override fun onCreate(savedInstanceState: Bundle?) {
        super.onCreate(savedInstanceState)
        if (savedInstanceState == null) {
            AppMetrica.reportAppOpen(this)
        }
    }

    override fun onNewIntent(intent: Intent) {
        super.onNewIntent(intent)
        AppMetrica.reportAppOpen(intent)
    }
}
public class DeeplinkActivity extends Activity {
    @Override
    protected void onCreate(@Nullable final Bundle savedInstanceState) {
        super.onCreate(savedInstanceState);
        if (savedInstanceState == null) {
            AppMetrica.reportAppOpen(this);
        }
    }

    @Override
    protected void onNewIntent(final Intent intent) {
        super.onNewIntent(intent);
        AppMetrica.reportAppOpen(intent);
    }
}
您可以通过 延迟深链 在 Android 上添加打开应用的功能。
要了解更多信息,请参见如何在 AppMetrica 中创建再营销活动?
请求延迟深链
要请求延迟深链,请将实现 DeferredDeeplinkListener 接口的类实例传递给 AppMetrica.requestDeferredDeeplink(DeferredDeeplinkListener listener) 方法。 该方法仅在应用程序首次启动并获取 Google Play 安装来源(Install Referrer)后返回延迟深链。
AppMetrica.requestDeferredDeeplink(object : DeferredDeeplinkListener {
    override fun onDeeplinkLoaded(deeplink: String) {
        Log.i("Deeplink", "deeplink = $deeplink")
    }

    override fun onError(error: DeferredDeeplinkListener.Error, referrer: String?) {
        Log.i("Deeplink", "Error: ${error.description}, unparsed referrer: $referrer")
    }
})
AppMetrica.requestDeferredDeeplink(new DeferredDeeplinkListener() {
    @Override
    public void onDeeplinkLoaded(@NotNull String deeplink) {
        Log.i("Deeplink", "deeplink = " + deeplink);
    }

    @Override
    public void onError(@NotNull Error error, @Nullable String referrer) {
        Log.i("Deeplink", "Error: " + error.getDescription() + ", unparsed referrer: " + referrer);
    }
});
要了解延迟深链路的更多信息,请参见延迟深链路支持
请求延迟深度链接参数
要请求延迟深链的参数,请将实现 DeferredDeeplinkParametersListener 接口的类实例传递给 AppMetrica.requestDeferredDeeplinkParameters(DeferredDeeplinkParametersListener listener) 方法。 该方法仅在从 Google Play 获取安装来源(Install Referrer)后的第一次应用启动时返回延迟深链参数。
AppMetrica.requestDeferredDeeplinkParameters(object : DeferredDeeplinkParametersListener {
    override fun onParametersLoaded(parameters: Map<String, String>) {
        // Processing deeplink parameters.
        for (key in parameters.keys) {
            Log.i("Deeplink params", "key: $key value: ${parameters[key]}")
        }
    }

    override fun onError(error: DeferredDeeplinkParametersListener.Error, referrer: String) {
        // Handling the error.
        Log.e("Error!", error.description)
    }
})
AppMetrica.requestDeferredDeeplinkParameters(new DeferredDeeplinkParametersListener() {
    @Override
    public void onParametersLoaded(@NotNull Map<String, String> parameters) {
        // Processing deeplink parameters.
        for (String key : parameters.keySet()) {
            Log.i("Deeplink params", "key: " + key + " value: " + parameters.get(key));
        }
    }

    @Override
    public void onError(@NotNull Error error, @NotNull String referrer) {
        // Handling the error.
        Log.e("Error!", error.getDescription());
    }
});
关于延迟深链的更多信息,请参见延迟深链支持
跟踪新用户
默认情况下,当用户第一次打开应用时,会被视为新用户。 如果你将 AppMetrica SDK 连接到已有活跃用户的应用,就可以设置跟踪新旧用户,以获取准确的统计数据。 通过初始化 AppMetrica SDK,使用扩展的 AppMetricaConfig 配置来进行设置:
var isFirstLaunch: Boolean = false
// Implement logic to detect whether the app is opening for the first time.
// For example, you can check for files (settings, databases, and so on),
// which the app creates on its first launch.
if (conditions) {
    isFirstLaunch = true
}
// Creating an extended library configuration.
val config = AppMetricaConfig.newConfigBuilder(API_KEY)
    .handleFirstActivationAsUpdate(!isFirstLaunch)
    .build()
// Initializing the AppMetrica SDK.
AppMetrica.activate(applicationContext, config)
boolean isFirstLaunch = false;
// Implement logic to detect whether the app is opening for the first time.
// For example, you can check for files (settings, databases, and so on),
// which the app creates on its first launch.
if (conditions) {
    isFirstLaunch = true;
}
// Creating an extended library configuration.
AppMetricaConfig config = AppMetricaConfig.newConfigBuilder(API_KEY)
        .handleFirstActivationAsUpdate(!isFirstLaunch)
        .build();
// Initializing the AppMetrica SDK.
AppMetrica.activate(getApplicationContext(), config);
禁用和启用发送统计数据
如果需要在发送统计数据前获得用户确认,应将库初始化为禁用发送选项。 在创建扩展库配置时,将false值传递给withDataSendingEnabled(boolean value)方法。
// Creating an extended library configuration.
val config = AppMetricaConfig.newConfigBuilder(API_KEY)
// Disabling sending data.
    .withDataSendingEnabled(false)
    .build()
// Initializing the AppMetrica SDK.
AppMetrica.activate(applicationContext, config)
// Creating an extended library configuration.
AppMetricaConfig config = AppMetricaConfig.newConfigBuilder(API_KEY)
        // Disabling sending data.
        .withDataSendingEnabled(false)
        .build();
// Initializing the AppMetrica SDK.
AppMetrica.activate(getApplicationContext(), config);
在用户确认可以发送统计数据后(例如在应用设置中或在第一次启动应用时给予权限),使用 AppMetrica.setDataSendingEnabled(true) 方法启用统计数据发送:
// Checking the status of the boolean variable. It shows the user confirmation.
if (flag) {
    // Enabling sending data.
    AppMetrica.setDataSendingEnabled(true)
}
// Checking the status of the boolean variable. It shows the user confirmation.
if (flag) {
    // Enabling sending data.
    AppMetrica.setDataSendingEnabled(true);
}
警告示例
您可以使用任何文本来告知用户统计数据的收集。 例如:
此应用使用由 YANDEX LLC 提供的 AppMetrica 分析服务,地址为列瓦·托尔斯泰街16号,莫斯科,俄罗斯119021(以下简称 Yandex),依据使用条款。
AppMetrica 分析应用使用数据,包括运行设备、安装来源,计算转化率,收集您的活动统计,用于产品分析、广告活动分析和优化,以及故障排查。 通过这种方式收集的信息无法识别您的身份。
AppMetrica 工具收集的关于您使用此应用的脱敏信息将会传输到 Yandex,并存储在位于欧盟和俄罗斯联邦的 Yandex 服务器上。 雅克沙将处理这些信息,以评估您使用应用的情况、为我们编制应用运行报告以及提供其他服务。
获取 SDK ID AppMetrica
要获取 AppMetrica SDK ID(DeviceId、DeviceIdHash、UUID),请使用 requestStartupParams() 方法。 要获取 appmetrica_device_id,请确保请求 DeviceIdHash.
val startupParamsCallback = object : StartupParamsCallback {
    override fun onReceive(
        result: StartupParamsCallback.Result?,
    ) {
        val deviceIdHash = result?.deviceIdHash
        // ...
    }

    override fun onRequestError(
        reason: StartupParamsCallback.Reason,
        result: StartupParamsCallback.Result?,
    ) {
        // ...
    }
}
AppMetrica.requestStartupParams(
    this,
    startupParamsCallback,
    listOf(
        StartupParamsCallback.APPMETRICA_UUID,
        StartupParamsCallback.APPMETRICA_DEVICE_ID,
        StartupParamsCallback.APPMETRICA_DEVICE_ID_HASH
    )
)
StartupParamsCallback startupParamsCallback = new StartupParamsCallback() {
    @Override
    public void onReceive(@Nullable Result result) {
        if (result != null) {
            String deviceId = result.deviceId;
            String deviceIdHash = result.deviceIdHash;
            String uuid = result.uuid;
        }
    }

    @Override
    public void onRequestError(@NonNull Reason reason, @Nullable Result result) {
        // ...
    }
};
AppMetrica.requestStartupParams(
        this,
        startupParamsCallback,
        Arrays.asList(
                StartupParamsCallback.APPMETRICA_DEVICE_ID,
                StartupParamsCallback.APPMETRICA_DEVICE_ID_HASH,
                StartupParamsCallback.APPMETRICA_UUID
        )
);
传送设备类型
如果要设置设备类型,请在创建配置时指定:
class YourApplication : Application() {
    override fun onCreate() {
        super.onCreate()
        // Creating an extended library configuration.
        val config = AppMetricaConfig.newConfigBuilder(API_KEY)
            // Defining the device type
            .withDeviceType(PredefinedDeviceTypes.TABLET)
            // ...
            .build()
        // Initializing the AppMetrica SDK.
        AppMetrica.activate(applicationContext, config)
        // Automatic tracking of user activity.
        AppMetrica.enableActivityAutoTracking(this)
    }
}
public class YourApplication extends Application {
   @Override
   public void onCreate() {
      super.onCreate();
      // Creating an extended library configuration.
      AppMetricaConfig config = AppMetricaConfig.newConfigBuilder(API_KEY)
              // Defining the device type
              .withDeviceType(PredefinedDeviceTypes.TABLET)
              // ...
              .build();
      // Initializing the AppMetrica SDK.
      AppMetrica.activate(getApplicationContext(), config);
      // Automatic tracking of user activity.
      AppMetrica.enableActivityAutoTracking(this);
   }
}
如果您没有找到所需答案,可以通过反馈表单提交您的问题。 请尽可能详细地描述问题。 如果可能,请附上截图。